These Paracord Flip Flops Come Together Fast!

Paracord Flip Flops DIY from Mom’s Lifesavers
Follow Our Tutorial for a Fun Summer Craft
Embellished Paracord Flip Flops!
Mom’s Lifesavers loves crafting and and this Paracord Flip Flop DIY tutorial is one of our all time favorite crafts.
The original post is from August 2013 – you can find the post here. We liked it so much we wanted to post it again for our readers and followers to see!
This Paracord Flip Flop tutorial also featured our very first Mom’s Lifesaver video! You can see all of our videos on the Mom’s Lifesavers YouTube Channel here.
SuppliesYou Will Need
- Flip flops – simple flip flops can be found at craft stores – we have gotten ours at Michaels but you can also find them at clothing, big box and discount stores
- Sharp scissors
- Lighter – we used a grill lighter – having a longer handle will keep your hand further from the flame
- Paracord – check Michaels for a great color selection of paracord – you can also buy it through Amazon and if you have a local Army/Navy Surplus store you will find some there to.
Video How To
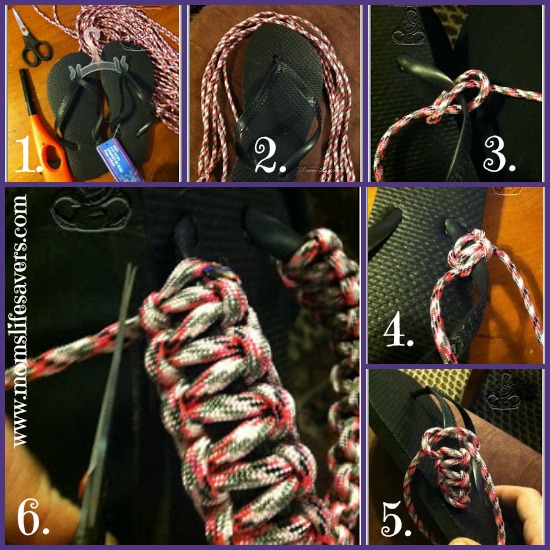
Picture Step By Step
Steps
- Gather your supplies for the Paracord Flip Flops
- Next measure the amount of paracord you need – you can do this by wrapping the paracord around the perimeter of the flip flop and then measure that amount out 6 times – this will give you the approximate amount you need, cut off any extra.
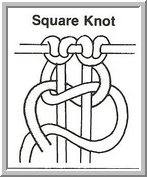
- Find the center point of the paracord you measured out – this will be the part you lay underneath the foot strap of the flip flop. Start with a basic square knot. TIP: See the illustration at the end of the ‘steps’ section. Note: with the flip flop, the foot strap acts as the 2 center cords.
- Continue this square knot pattern over the entire flip flop strap.
- When you get to the end, cut the paracord with the sharp scissors and using a lighter, heat the end of the paracord to seal/melt/set the last knot. TIP: Using a lighter with a long handle makes this step much easier!
- Enjoy your embellished Paracord Flip Flops!


Leave a Reply